Create Animated Gif from Mobile Recorded Movie in Photoshop 2020
Here’s how you can easily create animated gif from movie in Photoshop 2020! Creating long Animated Gifs online is a pain, especially if you want to convert them from movies. There are many websites that convert the movie for you, however, there are some major disadvantages to this:
- The quality is compromised
- There are few frames per second
- Some of them don’t let you upload more than one 10 sec long video.
Now you may think that video editors can do this for you. And you’re right, most video editors such as Final Cut Pro or Adobe After Effects can do that, but you need extra add-ons and plugins. It becomes really difficult for a 12 sec gif – they are simply not worth the effort!
Adobe Photoshop 2020 is the best tool you can have and you do not need any extra plugins or add-ons!
Here are a few steps to help you convert your video (whether it is a screen recorded video or a video you took on your iPhone).
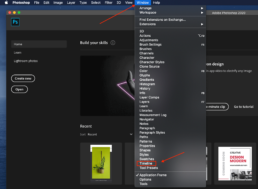
1. Open Photoshop and Enable “Timeline”
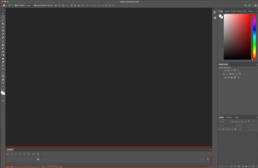
After you open Photoshop, you need to activate the “Timeline”. You can find “Timeline” the toolbar where it says “Window”. After you do that, Photoshop will open a blank screen where you will be able to see, at the bottom, a box named Timeline! Super easy.
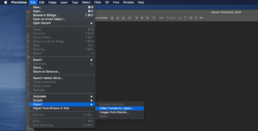
2. Import the Movie
Don’t drag and drop the video in photoshop. It will not work! In order to have a frame by frame, layered document, which you need in order to create a GIF, you need to follow this path:
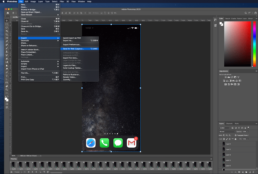
- Click File
- Go to “Import” and select “Video Frames to Layers”
Great job! Now choose the video you want to convert into a GIF. After you do that, a little box will pop-up in Photoshop. You can select the range of your video as you see in the picture.
Also, if the video is too long, you can reduce the frames here as well. Photoshop allows you to create GIFS including no more than 500 Layers. Which is more than enough without losing the quality!
Tip: Try importing the video without limiting the frames first. If Photoshop doesn’t allow you, or a message pops up that says Photoshop will limit the Layers to 500, then make sure you Limit the Frames to Every 2. You will not feel the difference so much. After all, it is a GIF!
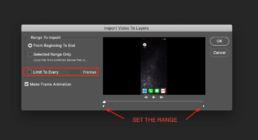
Lastly, make sure the”Make frame Animation” Box is checked and you’re good to jump on to the next step!
Click “OK”.
3. Making Some Adjustments
There is a possibility Photoshop will mess with the speed of your video. First, try to follow the next steps, ignore this chapter and export it as a GIF. If you do not see any modifications in the speed of your GIF compared to your original Video, you’re good. If you do see, than here is what you have to do:
After you import the movie, you will see many frames in your timeline. Below each frame, there is a little number. That is the one that you need to modify in order to decrease the speed of your GIF. You need to create a delay, otherwise, your GIF can hurry a bit!
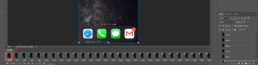
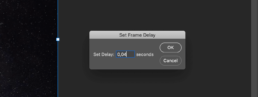
Before you jump on that, make sure you select all the layers in your Timeline a make a bulk change. Just select all of them, and then click on one number under one frame. We have noticed, for the GIF you will see at the end of the article, that changing the delay to 0,04 (from 0,02) will be as close to reality as it gets. Try playing with these!
4. Exporting the Movie as Animated GIF
Now that you managed to import your video in Frames, you need to export it as a GIF. Here’s how:
- Select File
- Go to Export
- Select “Save for Web”
A pop-up will show and you need to select, in the “Preset” Section above, GIF 128 Dithered. Then Click “Save”.
Insert the name of your GIF and hit “Save” again.
Great! You did it! You just created a GIF. We used a Screen Recording of our item, Sticky Mobile, where we wanted to showcase its PWA capabilities and show how easily you can turn on Dark Mode. Check it out below and tell us if you found this tutorial easy!
Thanks
Glad to have helped! 🙂